Difference between revisions of "S13: Smart Cube"
(→Implementation) |
(→Implementation) |
||
| Line 205: | Line 205: | ||
====FreeRTOS==== | ====FreeRTOS==== | ||
| − | =====WiFly | + | =====WiFly===== |
=====8x8 Matrix===== | =====8x8 Matrix===== | ||
Revision as of 01:57, 14 May 2013
Contents
Grading Criteria
- How well is Software & Hardware Design described?
- How well can this report be used to reproduce this project?
- Code Quality
- Overall Report Quality:
- Software Block Diagrams
- Hardware Block Diagrams
- Schematic Quality
- Quality of technical challenges and solutions adopted.
Smart CUBE
Abstract
This section should be a couple lines to describe what your project does.
Objectives & Introduction
Team Members & Responsibilities
- Phuoc Tran
- Interface LPC1758 with 8x8 RGB LED matrix using shift registers
- Christopher Harris
- Interface LPC1758 with WiFly module, server to WiFly communication and Website UI.
| Week | Planned Tasks | Achievement |
|---|---|---|
| |
|
|
| |
|
|
| |
|
|
| |
|
|
| |
|
|
| |
|
|
Parts List & Cost
| Part | Quantity | Unit Cost |
|---|---|---|
| >LPC 1758 SJSU Dev Board | 60 | |
| RN-XV Wifly | 34.99 | |
| 8x8 RGB LED Matrix | 5.99 | |
| SN74HC595 | .23 | |
| Jumper wire | 14.39 | |
| Wrapping wire | 5.00 | |
| Prototyping board | 6.99 | |
| Socket,IC,16 Pin | 2.25 | |
| 220 Ohm Resistor | 0.06 | |
| Raspberry Pi | 30.00 | |
| Ti Link 703N Mini Router | 24.00 | |
Design & Implementation
The design section can go over your hardware and software design. Organize this section using sub-sections that go over your design and implementation.
Hardware Design
Discuss your hardware design here. Show detailed schematics, and the interface here.
Hardware Interface
In this section, you can describe how your hardware communicates, such as which BUSes used. You can discuss your driver implementation here, such that the Software Design section is isolated to talk about high level workings rather than inner working of your project.
Software Design
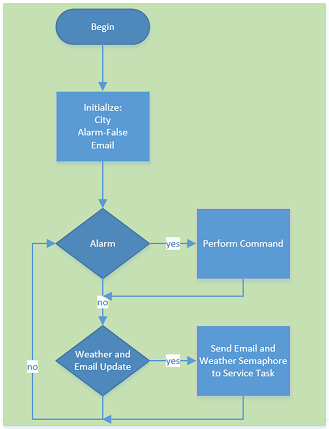
Implementation
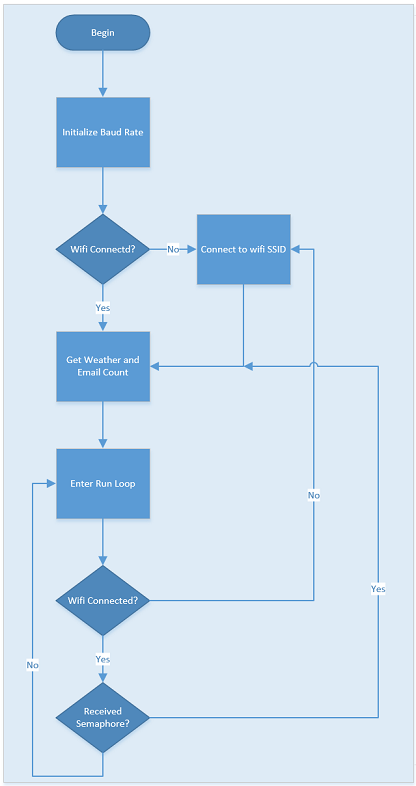
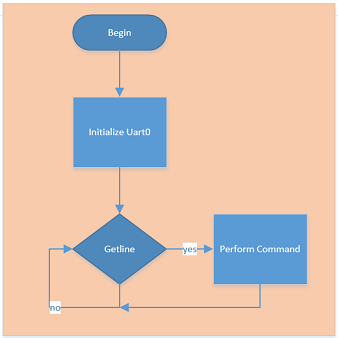
This section includes implementation, but again, not the details, just the high level. For example, you can list the steps it takes to communicate over a sensor, or the steps needed to write a page of memory onto SPI Flash. You can include sub-sections for each of your component implementation.
FreeRTOS
WiFly
8x8 Matrix
Web Interface
Front End
Back End
Testing & Technical Challenges
Describe the challenges of your project. What advise would you give yourself or someone else if your project can be started from scratch again? Make a smooth transition to testing section and described what it took to test your project.
Include sub-sections that list out a problem and solution, such as:
Wifi Connection Issues
Many wifi connection issues were encountered. To solve this problem, a dedicated task was created to re-connect to wifi if the connection was ever lost.
Conclusion
Conclude your project here. You can recap your testing and problems. You should address the "so what" part here to indicate what you ultimately learnt from this project. How has this project increased your knowledge?
Project Video
Upload a video of your project and post the link here.
Project Source Code
Send me your zipped source code and I will upload this to SourceForge and link it for you.
References
Acknowledgement
Any acknowledgement that you may wish to provide can be included here.
References Used
List any references used in project.
Appendix
You can list the references you used.


