Difference between revisions of "F12: Android Door Lock"
Rosemary f12 (talk | contribs) (→Wireless module) |
Rosemary f12 (talk | contribs) (→Hardware Design) |
||
| Line 274: | Line 274: | ||
Combining everything from Figure 1, Figure 2, and the table of LPC pins to WiFly pins, we get the schematic layout above. | Combining everything from Figure 1, Figure 2, and the table of LPC pins to WiFly pins, we get the schematic layout above. | ||
</p> | </p> | ||
| − | |||
====Door Lock Circuit==== | ====Door Lock Circuit==== | ||
Revision as of 08:21, 20 December 2012
Contents
Android Door Lock
Abstract
Most people at some point lose or forget to bring their key. However, how many people forget to bring their cellphone? Our Android Door Lock system provide the convenience of access control on a user's cell phones and website login.
Introduction & Features
- Andriod application to unlock the door through wifi
- Web server to handle user permission, set door codes, and view time stamps of when the door was accessed.
- MP3 player that plays customizable tunes when the door is unlocked.
- Filing system to stores all the log times that the door has been accessed.
Show list of your objectives. This section includes the high level details of your project. You can write about the various sensors or peripherals you used to get your project completed.
Team Members & Responsibilities
- Rosemary Chen
- Created the UART1 driver that enables communication between the wireless module and the micro controller.
- Created the Real Time Clock driver used for logging the time that users access the door.
- Created the user interface for setting and configuring the wifly module as well as automating the default settings for network connection.
- Created a parser for Alarm enabling, Light switching, password detecting, and time configuring.
- Created a task for:
- Correct password detection.
- Enabling the lock when password is detected.
- Logging the time when the door is accessed.
- Playing a tune when the door is unlocked.
- Cindy Li
- Created the UART1 driver that enables communication between the wireless module and the micro controller.
- Set up the web server for key and user management.
- Developed the web GUI that utilized JQuery, PHP, and HTML to provide the lock owner to track door users, grant permission to users, and sets the door code.
- Created the door lock driver circuit that supplies the required 9V.
- Assisted with troubleshooting drivers.
- Created background pictures for the Android application.
- Hai Wang
- Created a TCP client Android application that allows connectivity between the wireless module (server) and the Android application (client). The application is responsible for sending the correct door code to the server in order for the door to unlock.
- Implement Android's Light Sensor as a feature to the Android Door Lock application.
- Create sound effects using Android's MediaPlayer.
- Create a timestamp.
- Created a TCP client Android application that allows connectivity between the wireless module (server) and the Android application (client). The application is responsible for sending the correct door code to the server in order for the door to unlock.
Schedule
Show a simple table or figures that show your scheduled as planned before you started working on the project. Then in another table column, write down the actual schedule so that readers can see the planned vs. actual goals. The point of the schedule is for readers to assess how to pace themselves if they are doing a similar project.
| Week Number | Scheduled Items | Actual |
|---|---|---|
| November 2, 2012 |
|
Done |
| November 9, 2012 |
|
Done |
| November 16, 2012 |
|
Done |
| November 23, 2012 |
|
Done |
| November 30, 2012 |
|
Done |
| December 7, 2012 |
|
Done |
| December 14, 2012 |
|
Done |
Parts List & Cost
Give a simple list of the cost of your project broken down by components. Do not write long stories here.
| Parts | Cost |
|---|---|
|
Nexus 7 Android Tablet |
$249.00 |
|
RN-XV WiFly Module x3 |
$34.95 x3 |
|
Electric Door Strike |
$12.00 |
|
LPC2148 Microcontroller |
$60.00 |
|
3V Lithium CR1225 battery |
$5.99 x3 |
|
D-Link DIR-601 router |
$35.00 |
Cost excludes shipping and handling
Design & Implementation
The design section can go over your hardware and software design. Organize this section using sub-sections that go over your design and implementation.
Hardware Design
Discuss your hardware design here. Show detailed schematics, and the interface here.
Wireless Module
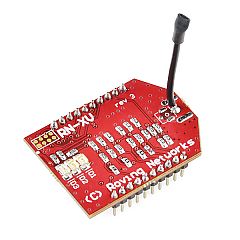
In order for the Android device to communicate with the LPC2148 microprocessor, we needed to use a wi-fi module, in this case we used WiFly. WiFly would make a wireless connection to a local network along with the Android device and laptop that is running the web server. Then data can be transmitted or received using the IP addresses assigned by the router.
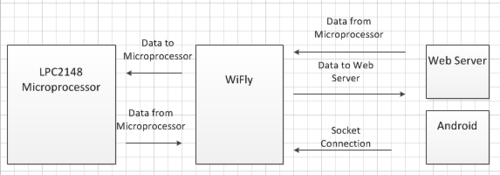
The main goal of our project is shown above. The block diagram of our project requirements shows how the devices are communicating between one another and the flow of data to and from devices. In our client server model, the clients are the web server and the Android device, whereas the server is the microcontroller connected to WiFly. The Android device and the web server are the clients because they sent out requests to unlock the door. Because of that, we require WiFly to act as server to wait on those requests. If it were the other way around, WiFly would have to constantly send packets out to check whether there is a user that is requesting to unlock the door and that would be inefficient.
In order to communicate, the android / webserver establishes a TCP connection with the WiFly(server). Once the connection is established, the Android is free to send data to WiFly which the data will travel back towards the LCP2148 micro controller through UART1. In turn the host can also send data to the Android or Web server using these communications.
|
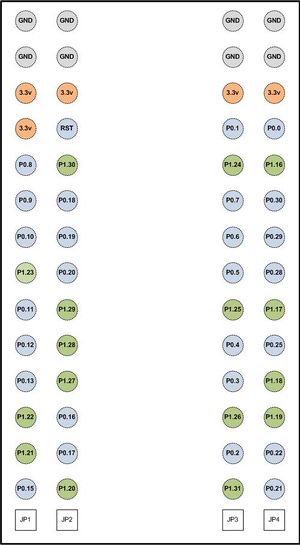
Listed above on the right column are the pins on the WiFly module. The left column are the pins on the LPC2148. Along side of it is the pin layout. From the table, you can see which pins are connected where to get proper UART communication between the LPC and the WiFly. This connection is needed for sending data from the PC to Wifly and vice versa.
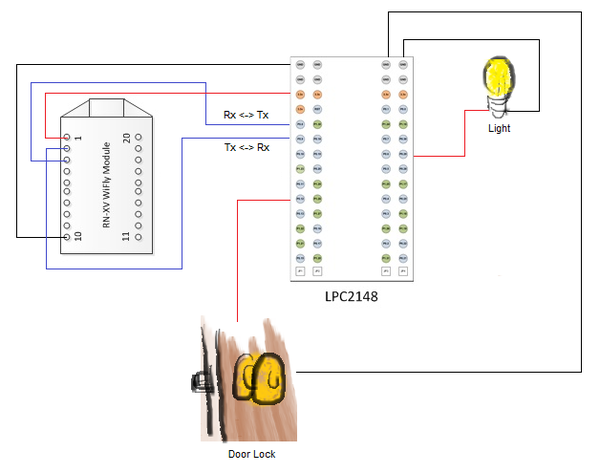
Combining everything from Figure 1, Figure 2, and the table of LPC pins to WiFly pins, we get the schematic layout above.
Door Lock Circuit
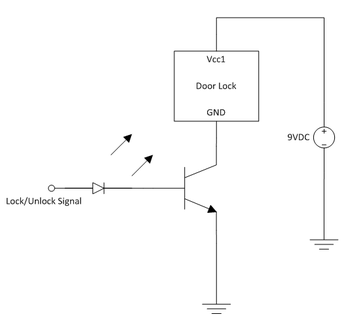
The door lock we are using is fail-safe magnetic lock. A fail-safe lock means that if there were no power, the lock would be unlock, as opposed to a fail-secure lock that is locked when not supplied with power. The 3.3V supplied by the LPC2148 from the GPIO port is not sufficient to power the door lock so a small circuit was made to supply 9V to the door lock. As seen below, the circuit consists of a transistor, an led, and a power supply.
The LED is connected to the lock and unlock control signal to show whether the lock should be locked or unlocked. The transistor acts as a switch to enable and disable the lock depending on the signal received from LPC. So when the microcontroller receives the correct password from either the Android device or the website, the microcontroller sends the signal to unlock the door.
Hardware Interface
In this section, you can describe how your hardware communicates, such as which BUSes used. You can discuss your driver implementation here, such that the Software Design section is isolated to talk about high level workings rather than inner working of your project.
SPI BUS
The LPC2148 Micro-controller communicates with the SD Card and the MP3 Decoder through the SPI bus. For both the SD Card and the MP3 Decoder, the chip select is transmitted through the SPI bus. For the decoder, data request and reset is also transmitted through SPI. The SD Card transmits MP3 data into the MP3 decoder. Once the decoder is done processing this data, it is then outputted into the I2C bus to the DAC.
I2C BUS
The LPC2148 Micro-controller communicates with the DAC and the MP3 Decoder using the I2C bus. The MP3 decoded data is outputted into the DAC so that it can convert digital signals into analog signals. The analog signals will be the sound produced out of our head phones which is connected to the audio jack. The micro controller can also send signals via I2C to the DAC to control volume, bass, treble, etc.
UART BUS
The uart bus allows communication between the LPC2148 micro-controller and the laptop as well as the WiFly module with the LPC2148. For the LPC2148, there are only two UART pins. In this case, UART0 is the connection between the computer and the micro-controller and UART1 is the connection between the micro-controller and the WiFly module. For the programmer to communicate with the WiFly module, the programmer would first have to send data to the LPC2148 micro-contoller through UART0, then redirect the data to the Wifly module using UART1. Once the WiFLy has received the data which may contain commands, the WiFly will respond by transmitting the requested data back to the LPC2148 via UART1 and from the LPC2148 back to the computer via UART0 so that the programmer can view the data that the Wifly transmitted.
GPIO PORT
The GPIO port is used to enable or disable the door lock as well as the light. When the LPC2148 micro-controller recognizes a key code that is sent from the Android, it will send 5v through the GPIO which is connected to the door lock circuit. Above is the GPIO initialization function. As you can see we used p0.12 and p0.21 as our GPIO ports. First the pins need to be selected and then the direction of the pin needs to be specified. For instance an output pin would be set to a 1 while an input would be set to 0.
Software Design
Show your software design. For example, if you are designing an MP3 Player, show the tasks that you are using, and what they are doing at a high level. Do not show the details of the code. For example, do not show exact code, but you may show psuedocode and fragments of code. Keep in mind that you are showing DESIGN of your software, not the inner workings of it.
User Interface Task
All kinds of initialization takes place at the beginning of this task such as SPI, I2C, SDCard, MP3 Decoder, DAC, Door Lock, RTC, and the WiFly. Besides initialization, the UI task allows the user to communicate with the WiFly module such as sending data through wifi and configuring the settings on the WiFly, to view the directory of the SDCard, to select MP3 files to be played from the SDCard, to view the current time on the LPC2148, and to read the logged time stamps from the SDCard.
WiFly Task
This task is responsible for outputting data to Hercules that's sent from the WiFly module, parsing the data, and recognizing key codes sent from the Android. When the door code matches, this task will enable the GPIO port (unlock the door), and send a song name to the song queue (play a tune). The data is parsed but special characters like '\n' or ' ' or even '_'. If you go to the testing section you can see that the password is sent followed by a '_' then the Alarm, Time, etc. In this case the '_' is used to parse the data sent from the Android / webserver.
MP3 Task
This task is responsible for reading mp3 files names from the queue and opening the file from the SDCard to the MP3 Decoder.
Log Task
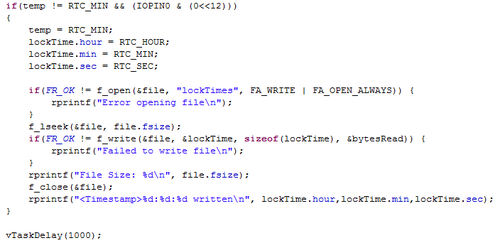
This task is responsible for logging the time that the door is accessed and also comparing the time with the Alarm time. If the RTC time matches with the Alarm time, this task will enable the door lock which in turn will open a file on the SD card and log the time that the lock was enabled. The time stamps can be viewed by typing "Read" in the UI task. As you can see above FA_OPEN_ALWAYS was used instead of FA_CREATE_ALWAYS is so that each time the file is open, the file would not be recreated and so that the data in the file would not be lost. seek is used so that the cursor would be at the very end of the file. This is important if you don't want any data to be over written.
Android Application
One of the main components for the Android Door Lock project is an Android application. In order to start designing the Android application, we had to download and install several software separately. Among these software are:
- Java JDK
- Java JRE
- Eclipse IDE (Java Edition)
- Android SDK
- ADT plugin for Eclipse at https://dl-ssl.google.com/android/eclipse/ (this site is to be placed in the Eclipse IDE when installing new software)
The most important coding part for the Android application is the creation of a socket connection . It is described below through the pseudocode:
try
{
     s = new Socket(ipServerAddress, portNumber);
}
catch(UnknownHost Exception e)
{
     e.printStackTrace();
}
catch(IOException e)
{
     e.printStackTrace();
}
The target line in the Manifest file must be removed otherwise the application will experience crashes.
In Eclipse, besides other files created, the other main general files to work with were:
- AndroidManifest.xml
- activity_main.xml
- MainActivity.java
- strings.xml
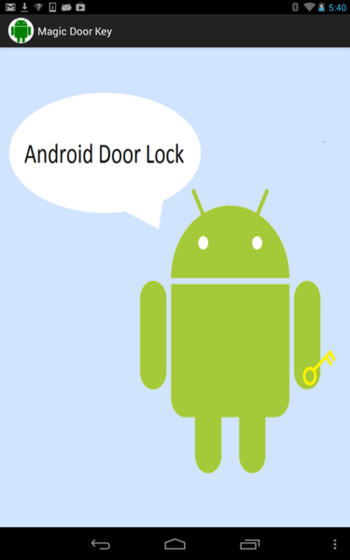
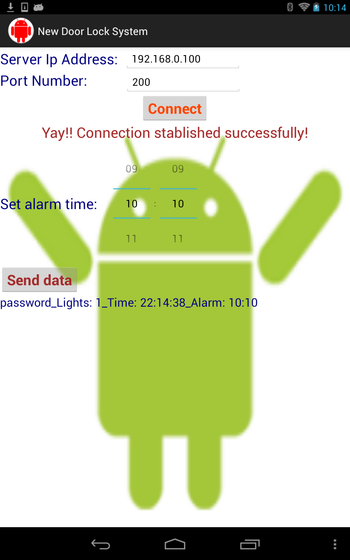
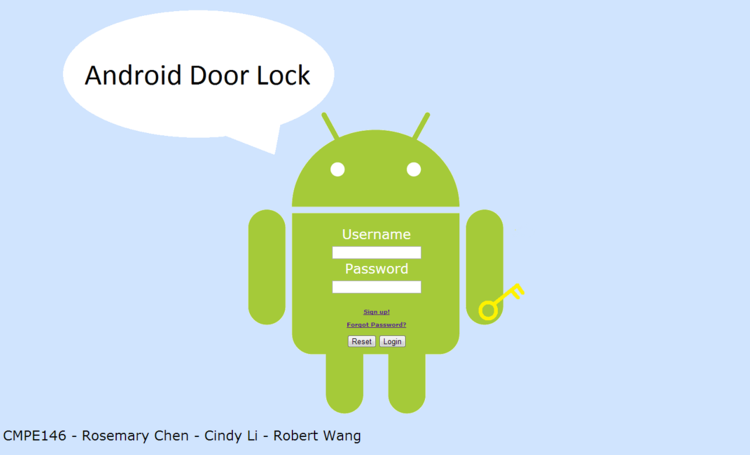
In the AndroidManifest.xml file, the code <uses-permission android:name="android.permission.INTERNET" ></uses-permission> must be included to allow permission for the application to use the Android's internet feature. The figures below show the graphic flow of the Android application.
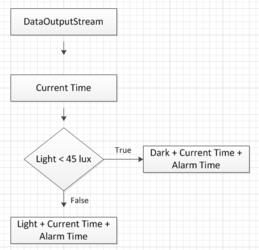
In general, the internal structure of the Android application works in several steps. First, it attempts to make a TCP connection to the Wifly module; it is done with through a router. Second, it uses Android's light sensor to sense the surrounding light intensity around the Android device. Third, it uses the internal clock of the Android device to send a the current time to the microprocessor. Fourth, it has a feature to set up a alarm time to also send it to the microprocessor. Fifth, the Android application has a feature to make error sounds when an error occurs. Finally, when all these data are ready, it sends to the the microprocessor through the wifly module. Below are the flowcharts for the process of TCP connection and Sending data to the wifly module.
Website Design
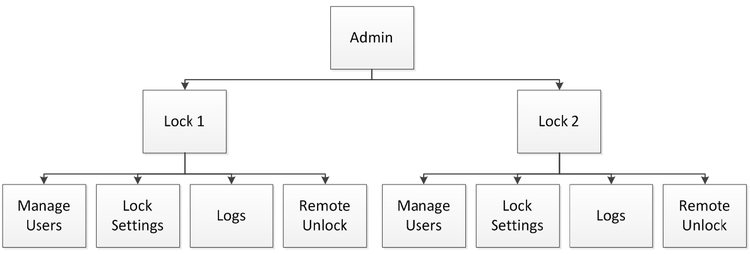
The back end of the website is supported by a PHP and mySQL and the front end is a mixture of HTML, CSS, PHP, and jQuery. The website was built with the hierarchy in Figure 13. The administrator's control is divided by the locks that the administrator owns. Then it is further broken down into managing users and locks either by creating, viewing or remotely unlocking.
The Front End
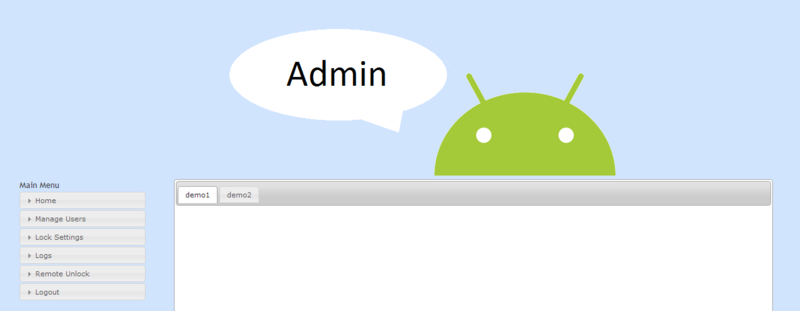
To design the front end, the main concern is usability and aesthetics. A flat HTML interface will not suffice, hence PHP, CSS, and jQuery were used. There are many online resources that will assist in creating the interface. The lock management system utilized jQuery UI, a javascript library, to help with the theme of the website. The sidebar and tabbed structure were drawn from one of the jQuery UI themes. In addition to jQuery UI, TableSorter 2.0, a jQuery plug-in, was used to further enhance the interface.
The Back End
The back end is handled by PHP and mySQL. From the interactions on the front end of the website, using php scripts, the data is process and the actions in response of those interactions are translated into queries into the database. For example, a request to create a new lock generates a HTML form within the tabbed structure. When the user submits the form,the values are passed into a PHP script where it is formatted into a mySQL query. The lock creation request triggers an insert statement into the database, which can be retrieved when a view request is called.
Aside from forming the mySQL queries, PHP is also responsible for initiating the socket creation for the TCP connection between the microprocessor and web server. It is through this that the administrator can unlock the door remotely without a physical key.
	//creates a socket
	$fp = fsockopen($IP, $port, $errno, $errstr, $timeout);

	if (!$fp) {
		echo "$errstr ($errno)<br />\n";
	}
	else
	{
		$out = "$string_to_write_out";
		//writes to the socket
		fwrite($fp, $out);
		//saves whatever is sent back
		$line = fgets($fp);
		if(!strncmp($expected_string, $line, $length_of_expected))
		{
			//fill with code in response of expected string
		}
	}
Implementation
This section includes implementation, but again, not the details, just the high level. For example, you can list the steps it takes to communicate over a sensor, or the steps needed to write a page of memory onto SPI Flash. You can include sub-sections for each of your component implementation.
User Interface Task
Before the user is able to input any data, all drivers and all data buses should be initialized first. If something is not initialized and the user tries to access it, the micro-controller may output the wrong data or may not allow access. Therefore, initialization functions are called at the beginning of a task. Once all initializations are done, the task enters a for loop where the user can enter and choose specified commands. Under the "wifly" command, the user may talk to the WiFly module. This works by sending whatever the user inputs into UART0. UART0 is the communication between the PC and the LPC2148. Once at the LPC, data from UART0 is transferred over to UART1. UART1 is the communication link between LPC2148 and the WiFly module. In response to the user, the wifly will send something back via UART1 and then printed to screen via UART0. If the user enters "ls" the SDCard directory will be outputted using the FAT functions to retrieve information. The "play" command will ask the user to input the name of an mp3 file given that the user knows the file name in the SDCard. Once the user enters the mp3 file name, it is sent into a song queue. "Time" simply prints out the hour, minute, and seconds using the RTC variables specified in the LPC2148.h. "Read" will open the locktimes file in the SDCard and read out the time stamps that were logged. Similar to reading the mp3 file, it is done in a while loop.
WiFly Task
The WiFly task will constantly check whether or not there is data sitting in the UART1 buffer. If there is, it will print it to screen through UART0. Because the buffer stores a chunk of data sent from WiFly, we designed this task to use a string compare with the buffer and the door code. To isolate the door code from the rest of the data in the buffer, a simple parser is made. To keep the buffer to a sizable amount the content in the buffer is printed to screen and emptied every time a '\n' or any specified character is detected. If the string compare matches, then a acknowledge message will be sent to both UART0 and UART1 to indicate that the door is open. In addition to the acknowledge message, the name of the tune is sent to the song queue by using osHandles and an enable function for the GPIO port will be called. The GPIO function sets the GPIO pin high for five seconds, and then disables it when five seconds are up allowing enough time for the user to open the door and enter before it locks.
MP3 Task
This task is responsible for reading mp3 files from the SDCard to the MP3 Decoder. To do this it it first takes the semaphore and loads the song name of the mp3 selected in the UI task from the song queue and opens the file. Once this mp3 file is opened in the SDCard, it reads the file from the SPI bus into the MP3 decoder. The reading is done in a while loop so that the file will continue to be read as long as there is data to be read. Inside this read while loop, the MP3 decoder is chip selected, and data is sent to it. Then the decoder is deselected and the semaphore is given back to the CPU. If it has reached the end of file, the while loop will break. When the file has been read, this task will close the file.
Real Time Clock Task
To implement the time stamp portion, the task constantly checks the minute hand. If the minute hand is not the same as the previous minute then and the lock is enabled, update the previous minute to the current minute, then print out the time, and store the current time into the time stamp file on the SD card.
Testing & Technical Challenges
Describe the challenges of your project. What advise would you give yourself or someone else if your project can be started from scratch again? Make a smooth transition to testing section and described what it took to test your project.
Include sub-sections that list out a problem and solution, such as: LPC2148 Microcontroller
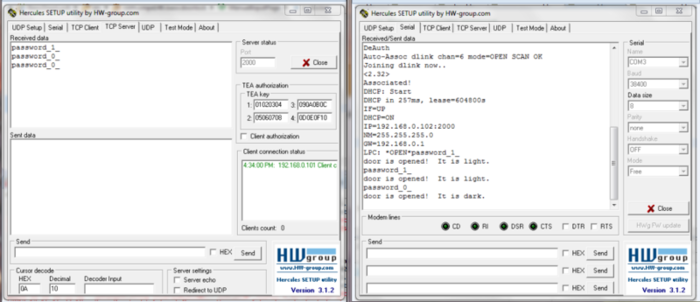
For the LPC2148 LPC microcontroller, it was tested with Hercules being a client. By manually sending the data from Hercules, Hercules should show the right expected result.
Android application
For the Android application, testing was performed in two modes. First, using the Hercules software as a TCP server since the Android application acts as a client application. Second, using physical devices such as a router, the wifly, the lpc2148 chip, and Hercules software as a serial connection. The reason we used these two modes is because we wanted to make sure that all features of the Android application worked well with other physical components of our project. One of the main issues was the removal of the automatic log-in feature, it was tested successfully in Hercules TCP Server but it wasn't sending data properly when tested with Hercules as serial connection using the wifly as physical device.
In the Android side, the main technical problem was to be able to get the Android application to properly communicate with the microprocessor through the wifly module. Virtually the whole design structure and coding had to be redesigned and rewritten to fit this requirement. Logcat was the main feature used to debug errors for the Android application, but there was time that we could not find the particular error therefore we needed to ask for help from previous CmpE 146 students who already had experience with it.
LPC2148 Microprocessor
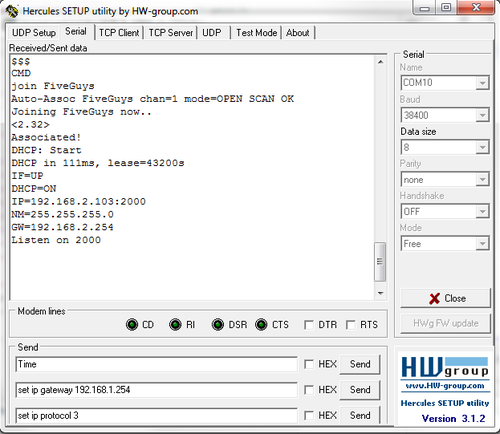
When programming the LPC2148, it was constantly being checked and debugged with Hercules. Any addition or modifications made was first checked with Hercules using the TCP client tab. For instance, WiFly setting configuration was heavily tested with Hercules TCP client. Below is a picture of WiFly initializing and setting up its network connection to get ready for clients to connect to it. A "$$$" needs to be sent to get into command mode.
Once in command mode, we attempt to join a network. In this case, our network is called "FiveGuys" so we send "join FiveGuys" to WiFly. Everything following that data is a response from WiFly that the connection has been established by replying it's IP address and the port that it is listening on.
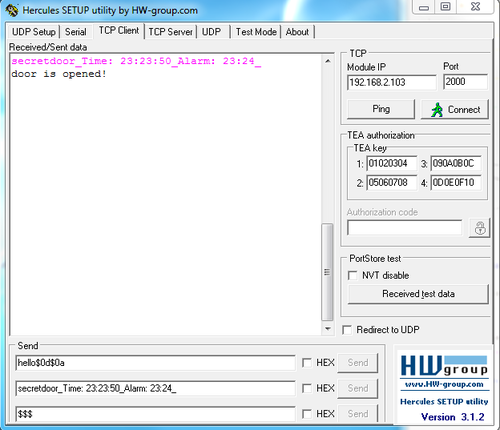
After establishing a connection with the network. We switch over to the TCP client side. To set up, we type in the IP address of the WiFly server which I mentioned earlier, as well as the port number. The default port number that the WiFly uses is 2000. Once the TCP client is connected to the WiFly, a "Hello!" should be sent from the WiFly to indicate that the connection has been made and that data can be sent to the WiFly. By using this method, each of us can test the LPC2148 server individually without having to constantly meet up and borrowing so and so's Android phone. A string of data is sent to WiFly. The pink indicates the data that should be sent by the Android and the black text is the response from the LPC2148. "secretdoor_" in this case is the password followed by the time and the alarm time "Time: 23:23:50_" and "Alarm: 23:24_" respectively. The alarm only takes in the hour and the minute because we feel seconds is a bit irrelevant to an alarm. Since the LPC replied with "Door is open" it means that the password was accepted and that the door is unlocked.
Problems Encountered
Many wifi connection issues were encountered.
In the Android side, there was an issue in the automatic connection feature that we were designing. Through a Java Singleton, data were able to send to Hercules TCP Server but not to the actual WiFly and LPC2148 board, only the manually punched in Android Intention was able to send data while the automatic connection feature was able to make a connection but not send data. Changing the design by removing the Java Singleton, the same result happened, both Intents were able to make a connection but only one intent was able to successfully send data. Because of this issue, we had to eliminate the automatic connection feature and implement a more basic version that would allow successful data sending.
In order to establish proper connection between the Android and the microprocessor through Wifly, the correct type and format of the data sent must be properly set for both Android and the microprocessor. We use the character "_" as an end character signalizing the ending point of a section of the data.
Our project requires quite a large amount of GPIO pins. Initially, I was a little careless and was unaware that some GPIO pins were already being used for other functions. It took a while to figure out why the MP3 didn't play whenever Lights were turned on or off. It turns out that the light pin was the chip select for the mp3 decoder which is why the sound would never work.
Another issue that we encountered was getting the door lock to work. Rosemary initially wrote the code out for an LED to test before the door lock arrived in the mail. However, unlike the LED, the door lock requires a low signal to unlock and a high to lock. The led requires a high to turn on and a low to turn off. Although switching the bit out may seem simple (it certainly looked simple to me), it turned out to be quite frustrating as some of the functions were broken due to unfavorable methods of bit comparisons.
Conclusion
Conclude your project here. You can recap your testing and problems. You should address the "so what" part here to indicate what you ultimately learnt from this project. How has this project increased your knowledge?
From the developer of the Android application point of view, this project required some dedication and careful thinking in order to come up with a working system. The Android application should be working without crashing when connected to other physical devices. If crashed, the whole system would not work. The initial goal of the team to do the assigned tasks together so that everybody could learn the three main topics of the Android Door Lock: Android programming, embedded system programming, and web development. Unfortunately, the tasks were divided according to each team member's programming expertise; this way would bring higher quality to the Android Door Lock project. I think that the two most important coding part was how to create a Socket connection and Java Singleton. Unfortunately, the Java Singleton did not work properly when physically connecting the devices. I focused only in the Android programming part because of some design issues I had trouble with; therefore, it took some time to design a working Android application for the Door Lock project. Below is the concluding point of view for the team member who developed most of the embedded system coding for the microcontroller.
This project has been most frustrating yet enlightening project I've been on. From the labs that were prior to the project I learned about the UART, SPI, and I2C protocol. It was in this project that I was given the opportunity to combine all three for the purpose of getting the Android Door Lock Project to work. The best part was establishing the communication between two devices and actually seeing it work and talk to each other. Those moments were the most ground breaking for me. I learned that device communication is one of the most important part of hardware. No single module can operate without proper communication with other devices. It's these little connections that make up bigger and greater things. From this course alone I learned a little about operating systems and how they work, file systems and what commands are appropriate, bit masking and how to properly set and unset variables, and communication protocols. After completing this project, and learning the ins and outs of my device, I learned that most issues that I've encountered were from misreading the data sheet / user manual. Although it is tedious to through every section, every section is necessary and may be of use somewhere down the line.
For instance, WiFly setup was a bit of a pain. Although the solution is simple looking back on it, we spent quite a bit of time trying to get it to talk through UART1. It was frustrating that we couldn't get WiFly to go into command mode. It turns out that we over looked that a '\r' and '\n' needed to be sent. These simple characters solved all our problem.
Another example, some GPIO pins were already in use by other components that were internal that I was unaware about. Because I over wrote a GPIO pin, a different function stopped working. I failed to reference the lab manual to check which pins were already being used.
In conclusion, for programming hardware, datasheets and manuals are a programmer's best friend. I learned better ways to trouble shoot my problems, how to establish communication between devices, a little bit about operating systems and efficiency, a little bit about file systems, and how MP3 files can be played. Unfortunately I was unable to learn about Android or how to make a Webserver but maybe that can wait for another time.
Project Video
Upload a video of your project and post the link here.
Project Source Code
Send me your zipped source code and I will upload this to SourceForge and link it for you. http://www.socialledge.com/sjsu/index.php?title=File:CmpE146_F12_Android_Door_Lock_LPC2148.zip
References
Acknowledgement
We'd like to thank:
Chris Cheng for helping us with UART1 that was much needed for the communication between the LPC2148 and Hercules.
Preet Kang for walking us through the our labs and our project the whole way.
Nazmun Nahar for helping us with the initial Android Socket connection.
Saba Memon for helping us with the initial Android Socket connection.
References Used
- Android Developers Website: http://developer.android.com/index.html
- RN-XV Wireless Module User Manual: http://dlnmh9ip6v2uc.cloudfront.net/datasheets/Wireless/WiFi/WiFly-RN-XV-DS.pdf
- TO-98 : http://www.classiccmp.org/rtellason/transdata/2n3858.pdf
- Komatineni, Satya, Dave MacLean, Sayed Hashimi. Pro Android 3. New York: Apress, 2011.
- The New Boston youtube lectures for Android : http://www.youtube.com/watch?v=exFmZ8AkYfQ
- jQuery UI : http://jqueryui.com/
- PHP documentation : http://us.php.net/docs.php
- TableSorter 2.0, jQuery plug-in : http://tablesorter.com/docs/
Appendix
You can list the references you used.
