Difference between revisions of "Development Package"
| Line 27: | Line 27: | ||
#: You can also watch a '''[http://www.youtube.com/watch?v=SPrEhSLgke4 Video Demonstration]''' | #: You can also watch a '''[http://www.youtube.com/watch?v=SPrEhSLgke4 Video Demonstration]''' | ||
<br/> | <br/> | ||
| − | + | ||
| + | === Virtual Machine Development Package === | ||
| + | [[VM Development Package|Follow this article if you want to run a virtual Linux image]]. Note that running a VM requires a beefy laptop/desktop, and it only runs well if you can dedicate at least 2.5Gbyte of RAM and 2 CPUs for the VM. So if you have a slow windows machine, I would recommend get the Windows package. | ||
== Step by Step Tutorial == | == Step by Step Tutorial == | ||
Latest revision as of 04:05, 30 August 2018
Contents
Related Articles
- 2012 SJ One Board
- 2012 SJ One Hello World Sample Project
- 2012 SJ One FreeRTOS Tutorial
- Generate Documentation from Sample Projects
- Eclipse : New Project & Tricks
- Windows Virtual Machine
LPC17xx (SJ One Board) Advanced Topics :
Hyperload LPC Bootloader :
Get Development Package
- This article shows you how to write software for SJ One Board. The first step to getting started with the Development Package is to get the package itself!
- Get the Development Package and unzip in your C drive
- It is important to NOT unzip at your desktop
- The unzipped path should not have spaces
- Follow the steps below; screenshots of reference images are included.
- You can also watch a Video Demonstration
Virtual Machine Development Package
Follow this article if you want to run a virtual Linux image. Note that running a VM requires a beefy laptop/desktop, and it only runs well if you can dedicate at least 2.5Gbyte of RAM and 2 CPUs for the VM. So if you have a slow windows machine, I would recommend get the Windows package.
Step by Step Tutorial
Here are steps to follow in order to compile program for Embedded Processors:
|
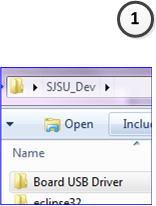
1. Plug-in your development board
|
|
|
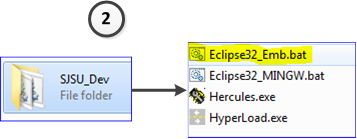
2. Once Board driver is installed, open up Eclipse32_Emb.bat file
|
|
|
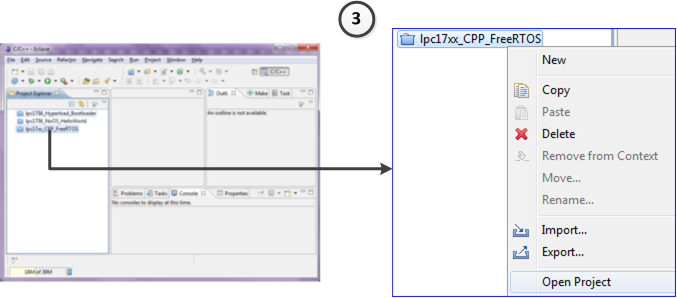
3. Once Eclipse opens, open ONLY ONE project. Close other projects if they are open.
|
|
|
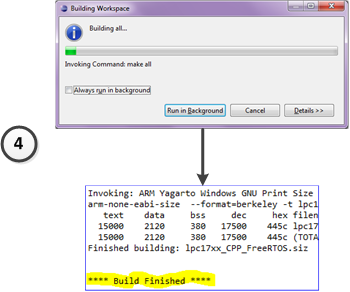
4. Press Ctrl+B to build your project
|
|
|
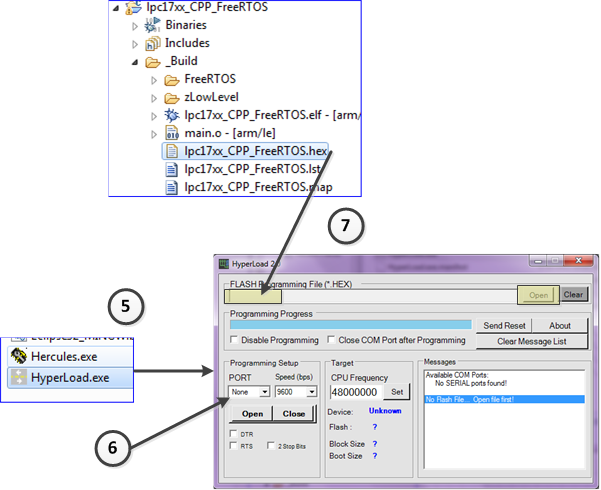
Now it is time to load the compiled program to the Embedded Board
|
|
|
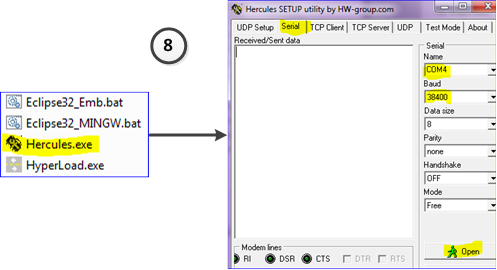
8. Open up Hercules from your Development Package
|
Troubleshooting & Hints
- Clicking on Set in Hyperload CPU Frequency section will make more choices appear under COM Port speed.
- You can program at any of the baud rates listed
- Note that you can only open up COM Port in ONE Program
- If you are programming, close COM Port in Hercules and open in Hyperload
- If you wish to look at the output, close COM Port in Hyperload and open in Hercules
- Hyperload will always grab the latest HEX file before programming
- Only change HEX file if you are working on another project.
