S14: E-Ink Display for Shopping Tags
Contents
Project Title
E-Ink Display for Shopping Stores
Abstract
This project aims to replace the stickers being placed to show prices and holiday offers for shelf items in stores like Target, Walmart, etc with E-Ink displays. The E-ink panels retain their display even after being powered off making them a much better alternative to LCD's and other related display's due to the savings in cost because of their low power consumption, better visibility angle and chipper cost. Using such automated displays reduces the error in pricing displays, reduces the need for manpower and provides a centralized place to manage inventory pricing.
Objectives & Introduction
This project intends to have a user interface to manage product prices and holiday offers of items in a store inventory. The user should be able to add an item description, item price, sale percentage, holiday offers start and end date in the GUI, and system should be able to automate the task of updating the display associated with the shelves to reflect the prices and description according to the sale timings.
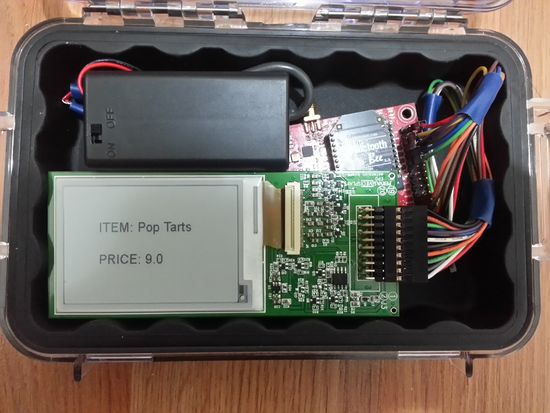
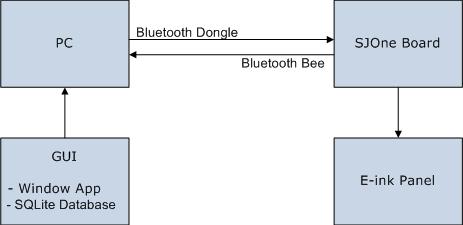
The project would use an E-ink panel, an extension board to interface between the E-ink panel and the SJOne board. Bluetooth bee on the board side and bluetooth dongle on the PC side serve as communication channels.
Team Members & Responsibilities
- Rishabh
- Window App in python for user interface
- Backend database design for product inventory in SQLite
- Driver for interfacing E-ink panel to SJOne Board
- Harsh
- E-ink display driver
- Wireless communication
- Code integration, testing and assemble system
Schedule
| Week# | Date | Task | Actual |
|---|---|---|---|
| 1 | 3/06 | Order Parts and E-Ink Display | Completed. Waiting for parts |
| 2 | 3/13 | Interface E-Ink Display with Packaged Sample Kit | Received Parts, Working on sample code |
| 3 | 3/20 | Interface E-Ink Display with LPC1758 board | Completed on 3/27 |
| 4 | 3/27 | E-Ink display driver | 4/03, Able to see sample images on 2.0" display |
| 5 | 4/03 | Implement wireless communication between boards | 4/10, Not used in final demo/code |
| 6 | 4/10 | Bluetooth communication between PC and board | 4/17, able to send sample text from PC to board |
| 7 | 4/17 | Set up windows app framework using Python | 4/24 |
| 8 | 4/24 | Add SQLite for back-end database inventory management | 5/01, also able to use larger display of 2.7" inch |
| 9 | 5/01 | Received price information from Window App to board | 5/10 |
| 10 | 5/08 | Test hardware and software design, bug fixes | 5/15 |
| 11 | 5/15 | Wiki Report, Project Video | 5/22 |
Parts List & Cost
| Part Number | Description | Qty | Unit Cost | Total Cost | Purchase Link |
| SJ One Board | SJSU development board, LPC1758 | 1 | $80.00 | $80.00 | SJSU SCE Store |
| SM027AS0T1-ND | E-Ink display | 1 | $43.26 | $43.26 | Pervasive Displays |
| - | Bluetooth Bee | 1 | $28.00 | $28.00 | dfrobot |
| - | Bluetooth Dongle | 1 | $7.00 | $7.00 | Fry's Store |
| - | Mini USB Cable for Power Supply | 1 | $8.00 | $8.00 | Fry's Store |
| - | AA Battery Pack | 1 | $7.00 | $7.00 | Jameco |
| Project Total | $173.26 |
Design & Implementation
The overall system design is divided into hardware and software design which are described in details as below.
Hardware Design
The hardware consists of one SJOne board connected to the extension board interfaced with the Eink panel and a bluetooth dongle connected to the PC. The PC sends data wirelessly to the SJOne board(connected to bluetooth bee) using a bluetooth dongle . The SJOne board receives data from the PC over UART2 port based on the selection in the GUI. It then transmits this data to the Eink panel and the extension board which then displays the required content.
The extension board and the Eink panel communicate among themselves using SPI bus running at 4-12 MHz. The detailed SPI specs can be seen from the file attached in the appendix section. The flowchart in the software section shows the working of SPI format for the system.
Hardware Interface
E-Ink Panel and EPD Extension Board Interface
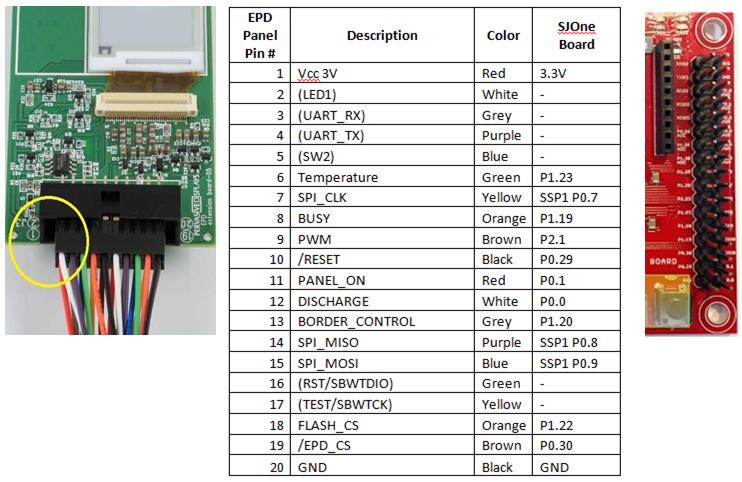
The EPD extension board supports driving 1.44, 2.0, and 2.7 inch ePaper display (EPD) modules with our development project. This expansion board provides a 20 control pins connection with SJOne board development kit to drive EPD via SPI interface. This extension board also has on board 8M bits serial flash memory and temperature sensor.
Following table shows our pin assignment between SJOne Board GPIO pins and EPD Extension board. Color coding of default wires of EPD extension board will help you to go through pin connections quickly.
Bluetooth Bee Interface
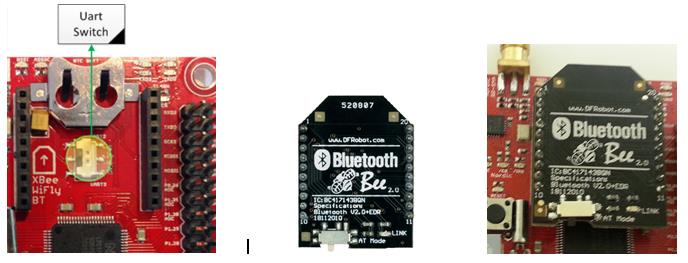
Bluetooth Bee is an easy to use Bluetooth Serial Port Profile(SPP) module compatible with existing Xbee sockets, designed for transparent wireless serial connection setup. Serial port Bluetooth module is fully qualified Bluetooth V2.0+EDR(Enhanced Data Rate) 3Mbps Modulation with complete 2.4GHz radio transceiver and baseband. It uses CSR Bluecore 04-External single chip Bluetooth system with CMOS technology and with AFH(Adaptive Frequency Hopping Feature). It has the smallest footprint of 12.7mm x 27mm. It simplifies our overall design and development part.
SJOne board has inbuilt Socket for Xbee or Wifi Module with a switch for the selection for Uart2 or Uart3 as shown in the following diagram.
Software Design
In our project, we have used FreeRTOS API and given framework from instructor as a starting point. (You can download code from a link given on this page under Appendix). We used Python programming language to develop a Window App for user interface on top of SQLite database having product inventory information.
We have two main FreeRTOS tasks which are terminal task and an eink panel task. The terminal task sets the bluetooth uart port as the standard input to receive data from the PC via bluetooth dongle. The eink panel task waits to receive the specified number of bytes that form the image string. After receiving these bytes on SJOne board, the E-ink Panel Task sends them to the eink panel to update display according to user specified settings.
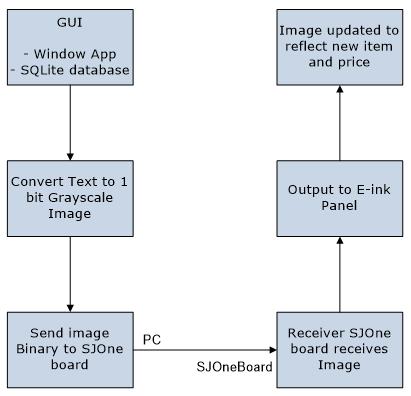
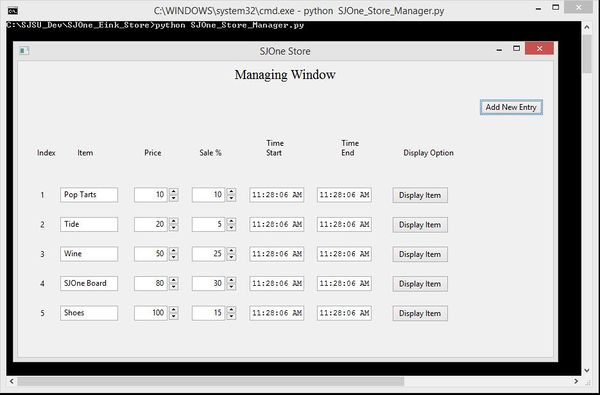
On the GUI side, we read the values from the fields of the row that the user selects. We used the Python imaging libraries, ImageOps and ImageDraw to convert product description and price information into a 1-bit grayscale image binaries and send it over to the SJOne board using the bluetooth dongle. After the time of the sale has elapsed, we send a new image string again with the item description and after-sale price, which will be updated on the E-ink panel display when holiday offer set by user ends.
Following screenshot shows overall software design of our project.
Software Implementation
Software implementations are divided into following subsections.
E-ink Display Driver
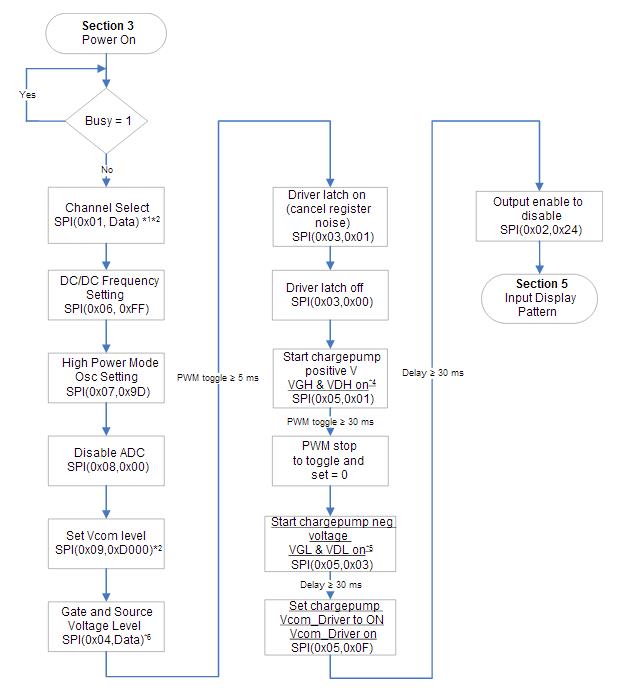
The flowchart below provides an overview of the actions necessary to update the E-ink display. The steps below refer to the detailed descriptions of the respective sections.
- Write to the memory
- Before powering on COG Driver, you should write the new pattern to image buffer, either SRAM or flash memory. The image pattern must be converted to a 1 bit bitmap format (Black/White) in prior to writing.
- Two buffer spaces should be allocated to store both previous and new patterns. The previous pattern is the currently displayed pattern. The new pattern will be written to the EPD. The COG Driver will compare both patterns before updating the EPD.
- We used 2.7" display having resolution of 264 x 176 pixels with new and old buffer of 11,616 bytes.
- Power On COG Driver
- Start: Initial State of pins should be VCC, /RESET, /CS, BORDER, SI, SCLK = 0
- PWM: It should be 100-300KHz, 50% duty cycle, square wave to eliminate the potential negative voltages that could occur at low temperature. Keeping PWM toggling until VGL & VDL is on (SPI(0x05,0x03)).
- BORDER: It is used to keep a sharp border while taken care of the electronic ink particles.
- Initialize COG Driver
- As shown in the 3rs flowchart, here few of the commands are different for different size of the display. You can find more detailed information from a datasheet under Appendix section.
- Write data from the memory to the EPD
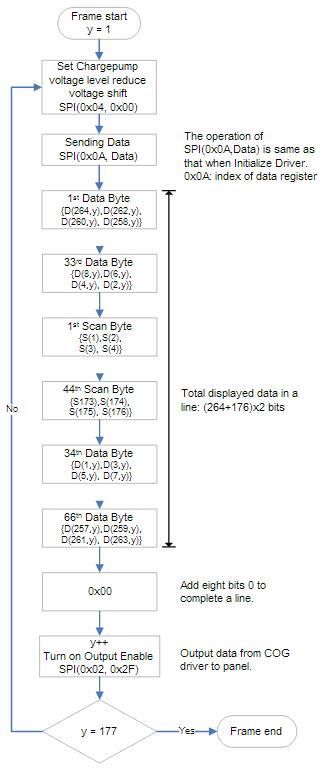
- We used 2.7" display which uses 264 Dots to represent 1 Line and a 2.7” frame of data is 176 lines * 264 dots. 2.7” display needs 21 frames of data per stage (number of frames used to write an intermediate pattern.)
- The COG Driver uses a buffer to store a line of data and then writes it to the display. It uses a buffer to update the display line by line.
- Detailed 2.7” display input data order is shown in the 3rd flowchart
- Power off COG Driver
- This step will power off and discharge the display.
- This step will power off and discharge the display.
Window Application Development
We used Python programming language to develop a Window App for user interface on top of SQLite database having product inventory information.
Used Tools and software packages for App development
- Python: Python version 2.7.6 link
- Pip: Install Pip which is a tool for installing and managing Python packages. link
- Pillow: Install Pillow using Pip which was just installed in previous step. Python Imaging Library (abbreviated as PIL) and it's successor called pillow is a free library for the Python programming language that adds support for opening, manipulating, and saving many different image file formats. link
- wxpython: Install wxpython for graphical user interface. wxPython is a wrapper for the cross-platform GUI API for the Python programming language. It is one of the alternatives to Tkinter which is bundled with Python. link
- PySerial: It is a library which provides support for serial connections (RS-232) over a variety of different devices such as old style serial ports, Bluetooth dongles, infrared ports, and so on. link
Button Click Events
- Add New Entry: Using button event called 'OnAddEntryPress' you can insert new product information into database using Insert command of SQL.
- Display Item: Button event in code called 'OnDisplayPress' is first validate all the user entered values. If validation is not successful, it will popup a dialog message asking user to reenter correct values. If validations are successful, event will write image binaries on serial port one byte at a time.
Database Design
- We used SQLite database as a backend for our windows app.
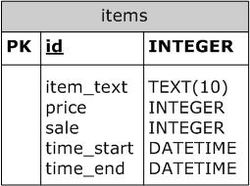
- Database named primarydb.db is created having a database table items.
- This table contains information of product id, description, price, sale percentage, sale start and end time, etc. Following figure shows a database entity diagram for more information.
Testing & Technical Challenges
Three major chunks of the project were testing in phases :-
- Board-to-board Communication: Wireless bluetooth was used for communication between the boards. A program to send a sample string continuously at 5 second interval was loaded into the transmitter SJOne board and a program to receive data by polling continuously was loaded into the receiver board. We opened the terminal window on the receiver board and reset the transmitter board and see the sample string come up on the terminal window after the specified interval. This validated that our communication was working correctly.
- GUI-to-board Communication: We ran a sample python script which opened the serial port to the SJOne board and sent sample data string continuously to the receiver board programmed with the program from the previous step. The terminal output matched the data we were sending which validated that GUI to board serial communication worked fine.
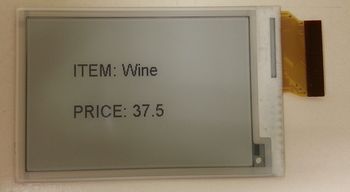
- Board-to-E-ink Panel Communication: Sample text image string converted to a 1-bit grayscale image was sent from the SJOne board to the interfaced E-ink panel and extension board. The panel displayed the provided image which verified that out driver was working correctly.
My Issue #1
The first major challenge was to understand the intricacies involved in the SPI bus driver for the E-ink panel. We were initially focusing on our debugging efforts above the driver layer at least in our program logic or communication errors. The SPI for the charge on glass (COG driver) required SPI mode to be such that CPOH and CPOL values were different than the values programmed in our driver. This required modifying the driver. This issue could have been mitigated by a more through reading and understanding of the datasheet.
My Issue #2
The second major problem was understanding the image conversion principles to create an image supported by the Eink panel. The Eink panel only supported 1-bit grayscale images. We were initially trying to send over a standard JPEG image converted to grayscale to test the panel. Ultimately, we converted text to a 1-bit grayscale image string for testing and debugging purposes.
Conclusion
We are successfully able to interface an E-ink panel with SJOne board over SPI and use it to display the selected items and price information from Window App. The system accept the time of sale into consideration and update the values on the display when the sale time ends. Also we have implemented error handling for many test cases where the time difference was not sufficient to update the values or if the time of holiday offer ends prior to offer start time.
We learnt a lot from this project including serial communication between the board and PC, wireless communication between boards, user-interface design and more-over thinking from a system level perspective to integrate all the individual pieces together using FreeRTOS's capabilities.
Project Video
Youtube Video Link: E-Ink Display Interface for shopping Tags
Project Source Code
SourceForge link: Download Source Code
References
Acknowledgement
We would like to acknowledge our instructor Preet Kang for teaching this class and supporting, guiding and inspiring us with our coursework and project.
References Used
- Preetpal Kang, Lecture notes of CMPE 244, Computer Engineering, San Jose State University, Spring 2014
- http://repaper.org/doc/extension_board.html
- https://github.com/repaper/gratis/blob/master/Sketches/demo/demo.ino
- https://learn.adafruit.com/repaper-eink-development-board/assembly-and-wiring
- https://learn.adafruit.com/repaper-eink-development-board?view=all
- http://mbed.org/cookbook/Wireless-Debugging-with-Bluetooth-Bee
- http://www.dfrobot.com/wiki/index.php?title=BLUETOOH_BEE_(SKU:TEL0023)
- http://www.seeedstudio.com/wiki/Bluetooth_Bee
- http://www.socialledge.com/sjsu/index.php?title=Main_Page
- http://en.wikipedia.org/wiki/E_Ink
