Difference between revisions of "S15: Tree Node using Google Protocol Buffers"
Proj user21 (talk | contribs) (→Hardware Design) |
Proj user21 (talk | contribs) (→Hardware Design) |
||
| Line 211: | Line 211: | ||
| − | {| style="width: | + | {| style="width:900px;" | |
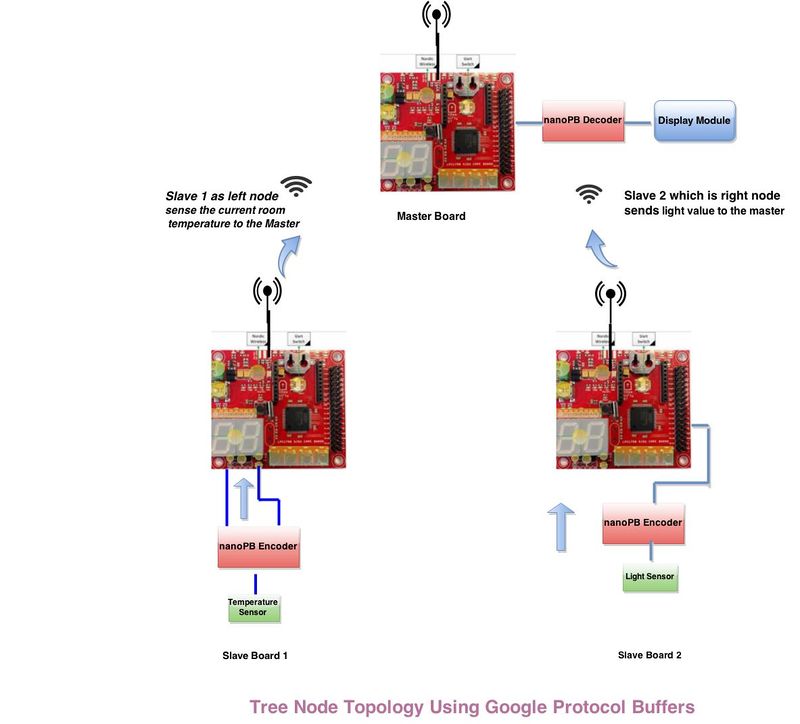
|[[File:CmpE244_S15_T5_BlockDiagram.jpg|800px|thumb|Project's Functional Diagram ]] | |[[File:CmpE244_S15_T5_BlockDiagram.jpg|800px|thumb|Project's Functional Diagram ]] | ||
|} | |} | ||
Revision as of 16:40, 20 May 2015
Contents
Grading Criteria
- How well is Software & Hardware Design described?
- How well can this report be used to reproduce this project?
- Code Quality
- Overall Report Quality:
- Software Block Diagrams
- Hardware Block Diagrams
- Schematic Quality
- Quality of technical challenges and solutions adopted.
Tree Node: using Google Protocol Buffers
Problem Statement
Machines cannot afford to send and receive large chunk of data among each other. There is a burning need of faster and lighter way of data serialization in the world of internet of things.
Our Solution
Google protocol buffers is the best available way of data serialization between servers. By implementing lighter and micro controller compatible version of GPB - nanoPB - we created a faster and better machine to machine communication network.
Abstract
This project is to implement google protocol buffers for serialization of the data. In this main role of protocol buffers is to encode the data before sending it out via nordic wireless communication and decoding the received data on the receiver side.
- This project mainly focuses on Following topics:
- Studying different types of Google Protocol Buffers (GPB)
      Google Protocol Buffers
      Nano PB
      Flat Buffers
- Implementing Nordic wireless communication between different boards by using these implemented google protocol buffers.
- Studying network architecture - Tree Achitecture
Objectives & Introduction
Show list of your objectives. This section includes the high level details of your project. You can write about the various sensors or peripherals you used to get your project completed.
Team Members & Responsibilities
- Aditya Bankar
- Nordic wireless and flatbuffers
- Aniruddha Kawade
- Google protocol buffers and NanoPB
- Shreeram Gopalakrishnan
- Google protocol buffers and NanoPB
- Vinod Pangul
- Nordic wireless and flatbuffers
Project Schedule
Show a simple table or figures that show your scheduled as planned before you started working on the project. Then in another table column, write down the actual schedule so that readers can see the planned vs. actual goals. The point of the schedule is for readers to assess how to pace themselves if they are doing a similar project.
| Week No. | Start Date | Planned End Date | Task | Status | Actual End Date |
|---|---|---|---|---|---|
| 1 | 03/31/2015 | 04/07/2015 |
* Decision on all required modules and placing the order online. * Research on Google Protocol Buffers |
|
04/07/2015 |
| 2 | 04/06/2015 | 04/13/2015 |
* Environment setup of Google Protocol Buffer on windows and accomplish an example task such as hello world. |
we are able to compile the basic program successfully.(AI: to figure out run part of the compiled code).
|
04/29/2015 |
| 3 | 04/13/2015 | 04/20/2015 |
* Nordic Wireless: Ping Test between two SJOne boards. |
|
04/29/2015 |
| 4 | 04/20/2015 | 04/27/2015 |
* Nordic wireless all development and testing for 2-3 SJOne Boards. * Successful implementation of nanoPB ( GPB variant) |
|
--/--/---- |
| 5 | 04/27/2015 | 05/04/2015 |
* Start code development for LCD module. * Testing Code via Google Protocol Buffers. |
|
--/--/---- |
| 6 | 05/04/2015 | 05/11/2015 |
* Integration of all modules with parallel testing. |
|
--/--/---- |
| 7 | 05/11/2015 | 05/18/2015 |
* Integration of the code with Google Protocol Buffers. |
|
--/--/---- |
| 8 | 05/18/2015 | 05/25/2015 |
* Final Testing and integration of additional features if time permits. |
|
--/--/---- |
| 9 | 05/25/2015 | 05/25/2015 |
* Final Demo Day |
|
--/--/---- |
Parts List & Cost
Following are the components and modules required for this project.
Parts List & Cost
| Item# | Part Desciption | Vendor | Part Number | Qty | Cost |
|---|---|---|---|---|---|
| 1 | SJOne Board | SCU Room | Revision 2 | 3 | $240 |
| 2 | Antenna's | SCU room | CMPE 295 | 3 | $12 |
| 3 | LCD Module | Sparkfun Instruments | SN65HVD232D | 1 | - |
| 4 | Reserved for extra modules | NA | NA | NA | NA |
Design & Implementation
The design section can go over your hardware and software design. Organize this section using sub-sections that go over your design and implementation.
Hardware Design
Discuss your hardware design here. Show detailed schematics, and the interface here.
Hardware Interface
In this section, you can describe how your hardware communicates, such as which BUSes used. You can discuss your driver implementation here, such that the Software Design section is isolated to talk about high level workings rather than inner working of your project.
Software Design
Show your software design. For example, if you are designing an MP3 Player, show the tasks that you are using, and what they are doing at a high level. Do not show the details of the code. For example, do not show exact code, but you may show psuedocode and fragments of code. Keep in mind that you are showing DESIGN of your software, not the inner workings of it.
Implementation
This section includes implementation, but again, not the details, just the high level. For example, you can list the steps it takes to communicate over a sensor, or the steps needed to write a page of memory onto SPI Flash. You can include sub-sections for each of your component implementation.
Testing & Technical Challenges
Describe the challenges of your project. What advise would you give yourself or someone else if your project can be started from scratch again? Make a smooth transition to testing section and described what it took to test your project.
Include sub-sections that list out a problem and solution, such as:
My Issue #1
Discuss the issue and resolution.
Conclusion
Conclude your project here. You can recap your testing and problems. You should address the "so what" part here to indicate what you ultimately learnt from this project. How has this project increased your knowledge?
Project Video
Upload a video of your project and post the link here.
Project Source Code
References
Acknowledgement
Any acknowledgement that you may wish to provide can be included here.
References Used
List any references used in project.
- Google's Nanopb web: http://koti.kapsi.fi/jpa/nanopb/docs/concepts.html
- Nanopb API references: http://koti.kapsi.fi/jpa/nanopb/docs/reference.html
Appendix
You can list the references you used.

